ReactNative Tutorial
Getting Started
Environment
1.nodejs
2.npm4 why not npm5?
3.yarn
4.watchman
watchman permission : sudo chown -R $(whoami) $(brew --prefix)/*
5.react-native-cli or create-react-native-app
1
| npm install -g react-native-cli
|
Run it
1
| react-native init ReactNativeTutorial
|
1
2
| react-native run-ios
react-native run-android
|
Android issue
- ./android/gradle/wrapper/gradle-wrapper.properties
- ./android/build.gradle
- ./android/app/build.gradle
- ./android/local.properties
- touch ~/.gradle/gradle.properties && echo “org.gradle.daemon=true” >> ~/.gradle/gradle.properties
iOS issue
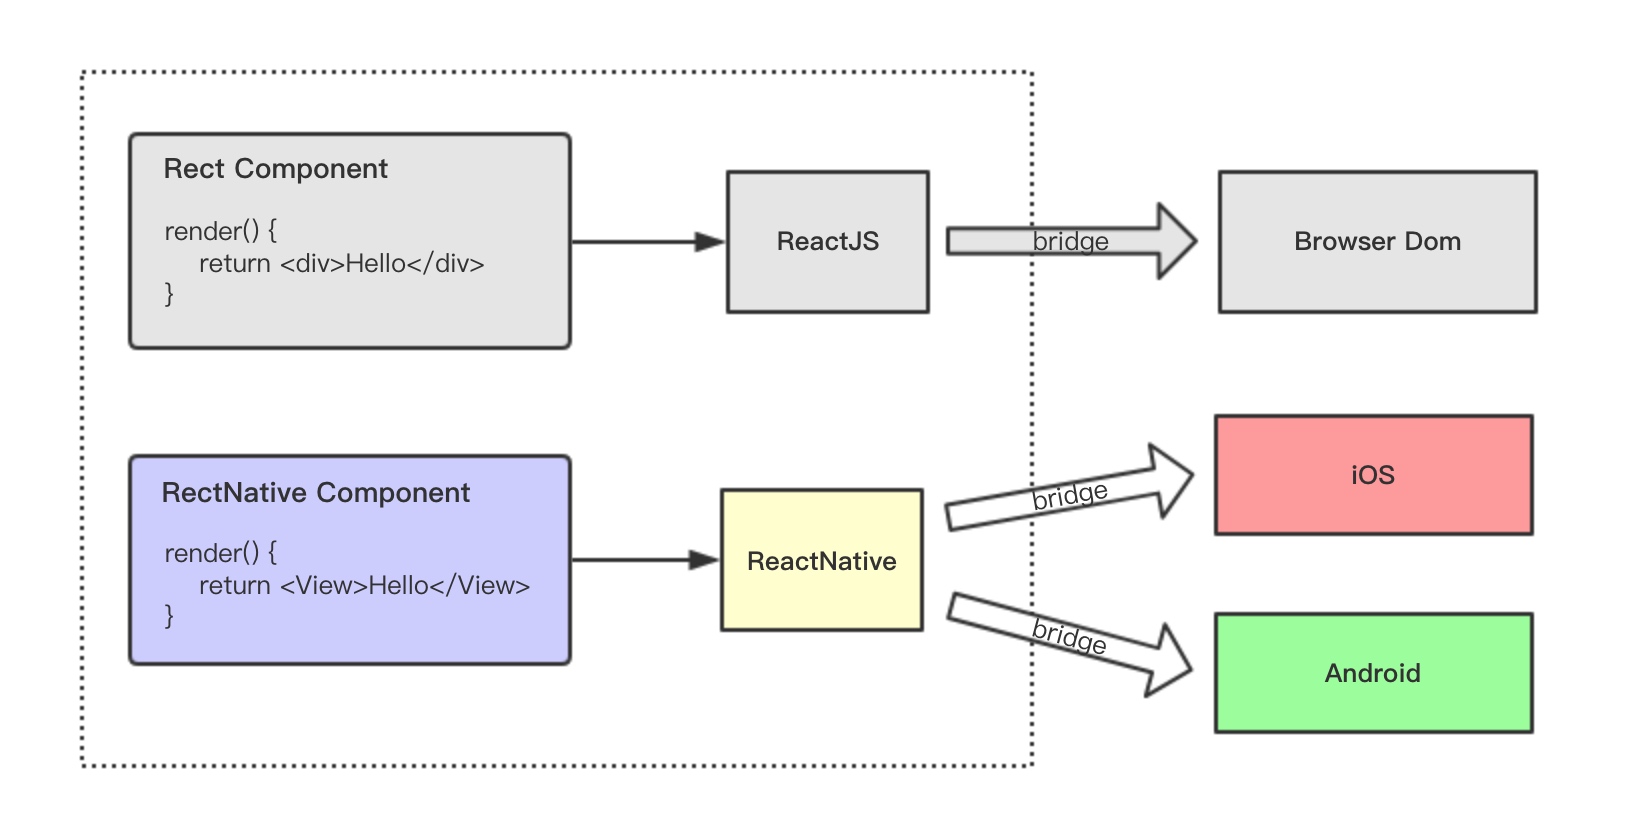
How it works
ES6 标准
参考-1
参考-2
Modules
1
2
3
4
5
6
7
8
9
10
11
| import React from 'react';
import MyComponent from './MyComponent';
import {parseData} from './xxx';
import * as APIs from '../constants/ServerAPIs';
export default class MyComponent extends Compoent {
}
export function parseData() {
}
|
Classes & Method
1
2
3
4
5
6
| class Photo extends React.Component {
handleClick(event) {
}
render() {
}
}
|
Property initializers
1
2
3
4
5
6
7
8
9
10
11
12
13
14
15
| class Todo extends React.Component {
render() {
return (
<Text>Hello</Text>
);
}
}
Todo.defaultProps = {
checked: false,
maxLength: 10,
};
Todo.propTypes = {
checked: React.PropTypes.bool.isRequired,
maxLength: React.PropTypes.number.isRequired,
};
|
State
1
2
3
4
5
6
7
8
9
10
11
12
13
14
| class Todo extends React.Component {
state = {
maxLength: this.props.maxLength,
}
}
class Todo extends React.Component {
constructor(props){
super(props);
this.state = {
maxLength: this.props.maxLength,
};
}
}
|
Arrow functions
1
2
3
4
5
6
|
class Todo extends React.Component {
    render(){
        return <TouchableOpacity onPress={() => console.log("Arrow function called") }}/>
    }
}
|
Dynamic property names & template strings
1
2
3
4
5
| const name = "Bob", time = "today";
let msg = `Hello ${name}, how are you ${time}?`
const stateName = "toggle"
this.setState({ [`${stateName}Value`]: true });
|
Destructuring & spread attributes
1
2
3
4
5
6
7
8
9
10
11
12
13
14
| class Todo extends React.Component {
render() {
var {
className,
...others,
} = this.props;
return (
<div className={className}>
<TodoList {...others} />
<button onClick={this.handleLoadMoreClick}>Load more</button>
</div>
);
}
}
|
Default Parameters
1
2
3
| function test(height = 50, color = 'red') {
...
}
|
Component
1
2
| class CustomComponent extends Component {
}
|
JSX
1
2
3
4
5
6
7
8
9
10
| class CustomComponent extends Component {
render() {
<View>
<Text>This is a title!</Text>
<View>
<Text>This is a Summary</Text>
</View>
</View>
}
}
|
props & state
1
2
3
4
5
6
7
8
9
10
11
12
13
14
15
16
17
18
19
20
21
22
23
24
25
|
class ParentComponent extends Component{
constructor(props) {
super(props)
this.state = {
childName = "子组件"
}
}
render(){
return(
<ChildComponent name={this.state.childName}>
)
}
}
// 子组件
class ChildComponent extends Component{
render(){
return(
<Text>{this.props.name}</Text>
)
}
}
|
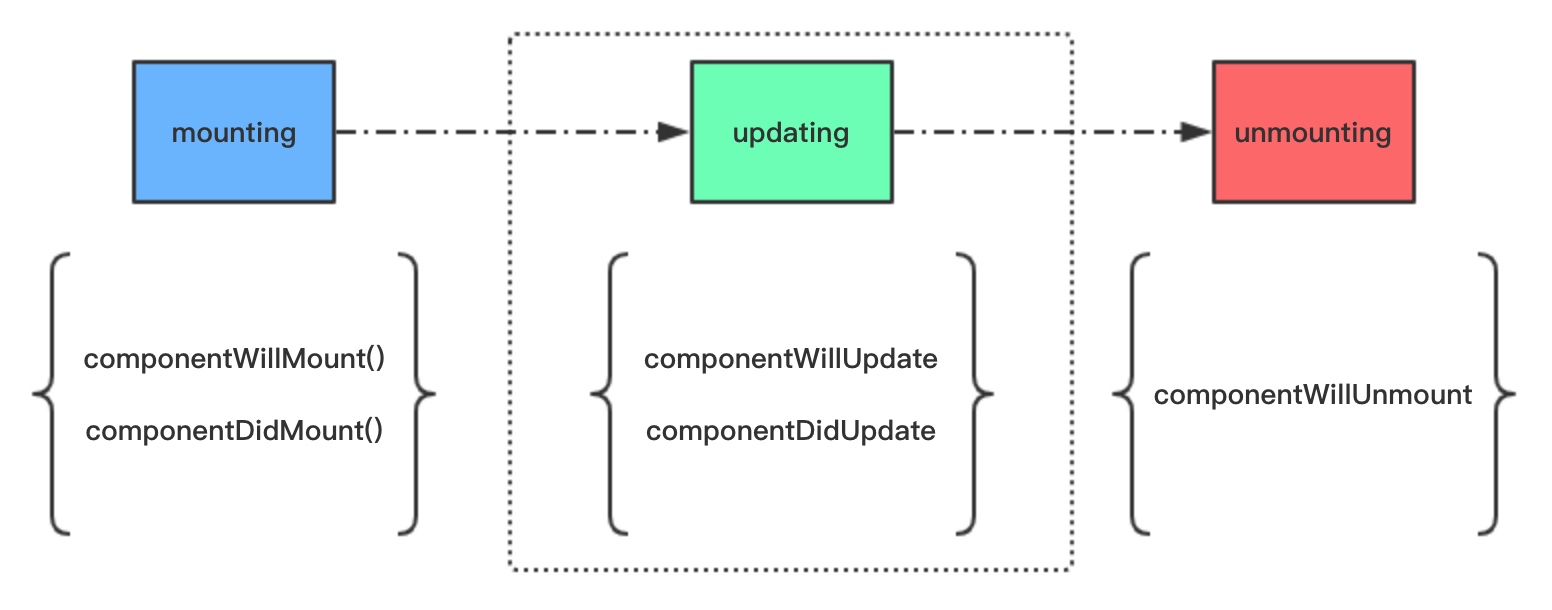
Lifecycle
1
2
3
4
5
6
7
8
9
10
11
12
13
14
15
|
componentWillMount()
componentDidMount()
componentWillUpdate(object nextProps, object nextState)
componentDidUpdate(object prevProps, object prevState)
componentWillUnmount()
|
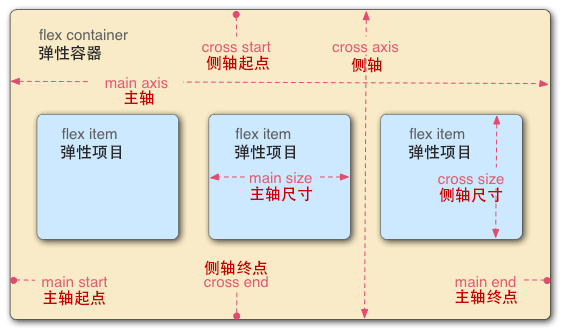
Style & FlexBox
组件使用
Image
本地图片
1
| <Image source={require('./assets/email.png')}/>
|
Packager 会打包所有的图片并且依据屏幕精度提供对应的资源。比如: iPhone 6 会使用 email@2x.png,而 Pixel 上则会使用 email@3x.png。如果没有图片恰好满足屏幕分辨率,则会自动选中最接近的一个图片。
网络图片
1
| <Image source={{ uri: 'https//assets.domain/xxx.jpg'}}
|
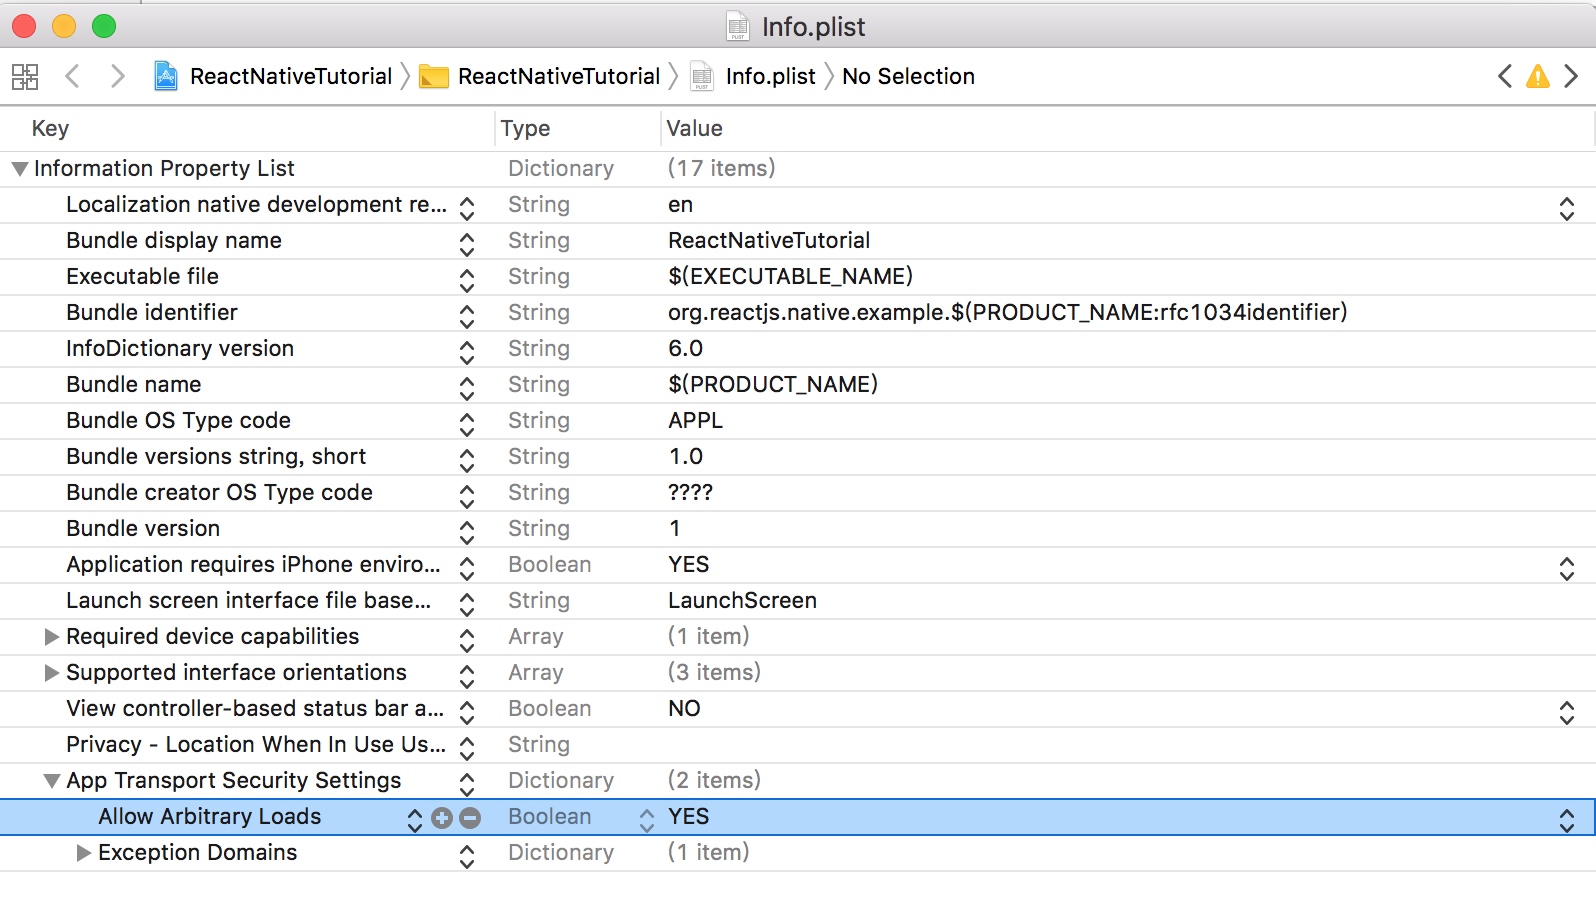
ATS issue
ListView
1
2
3
4
| <ListView
dataSource={...}
renderRow={...}
/>
|
Animation
参考�
Network
React Native 提供了和 web 标准一致的Fetch API
1
2
3
4
5
6
7
8
9
10
11
12
13
|
fetch('https://mywebsite.com/endpoint/', {
  method: 'POST',
  headers: {
    'Accept': 'application/json',
    'Content-Type': 'application/json',
  },
  body: JSON.stringify({
    firstParam: 'yourValue',
    secondParam: 'yourOtherValue',
  })
})
|
AsyncStorage
是一个简单的、异步的、持久化的 key-value 存储系统,它对于App来说是全局性的。它用来代替 LocalStorage
1
2
3
4
5
6
7
8
9
10
11
12
13
14
15
16
17
18
| async saveUserName(account: String) {
let key = '@key-user-name';
try {
await AsyncStorage.setItem(key, account);
} catch (error) {
console.warn(error)
}
};
async getUserName() {
let key = '@key-user-name';
try {
return await AsyncStorage.getItem(key);
} catch (error) {
console.warn(error)
}
return null;
};
|
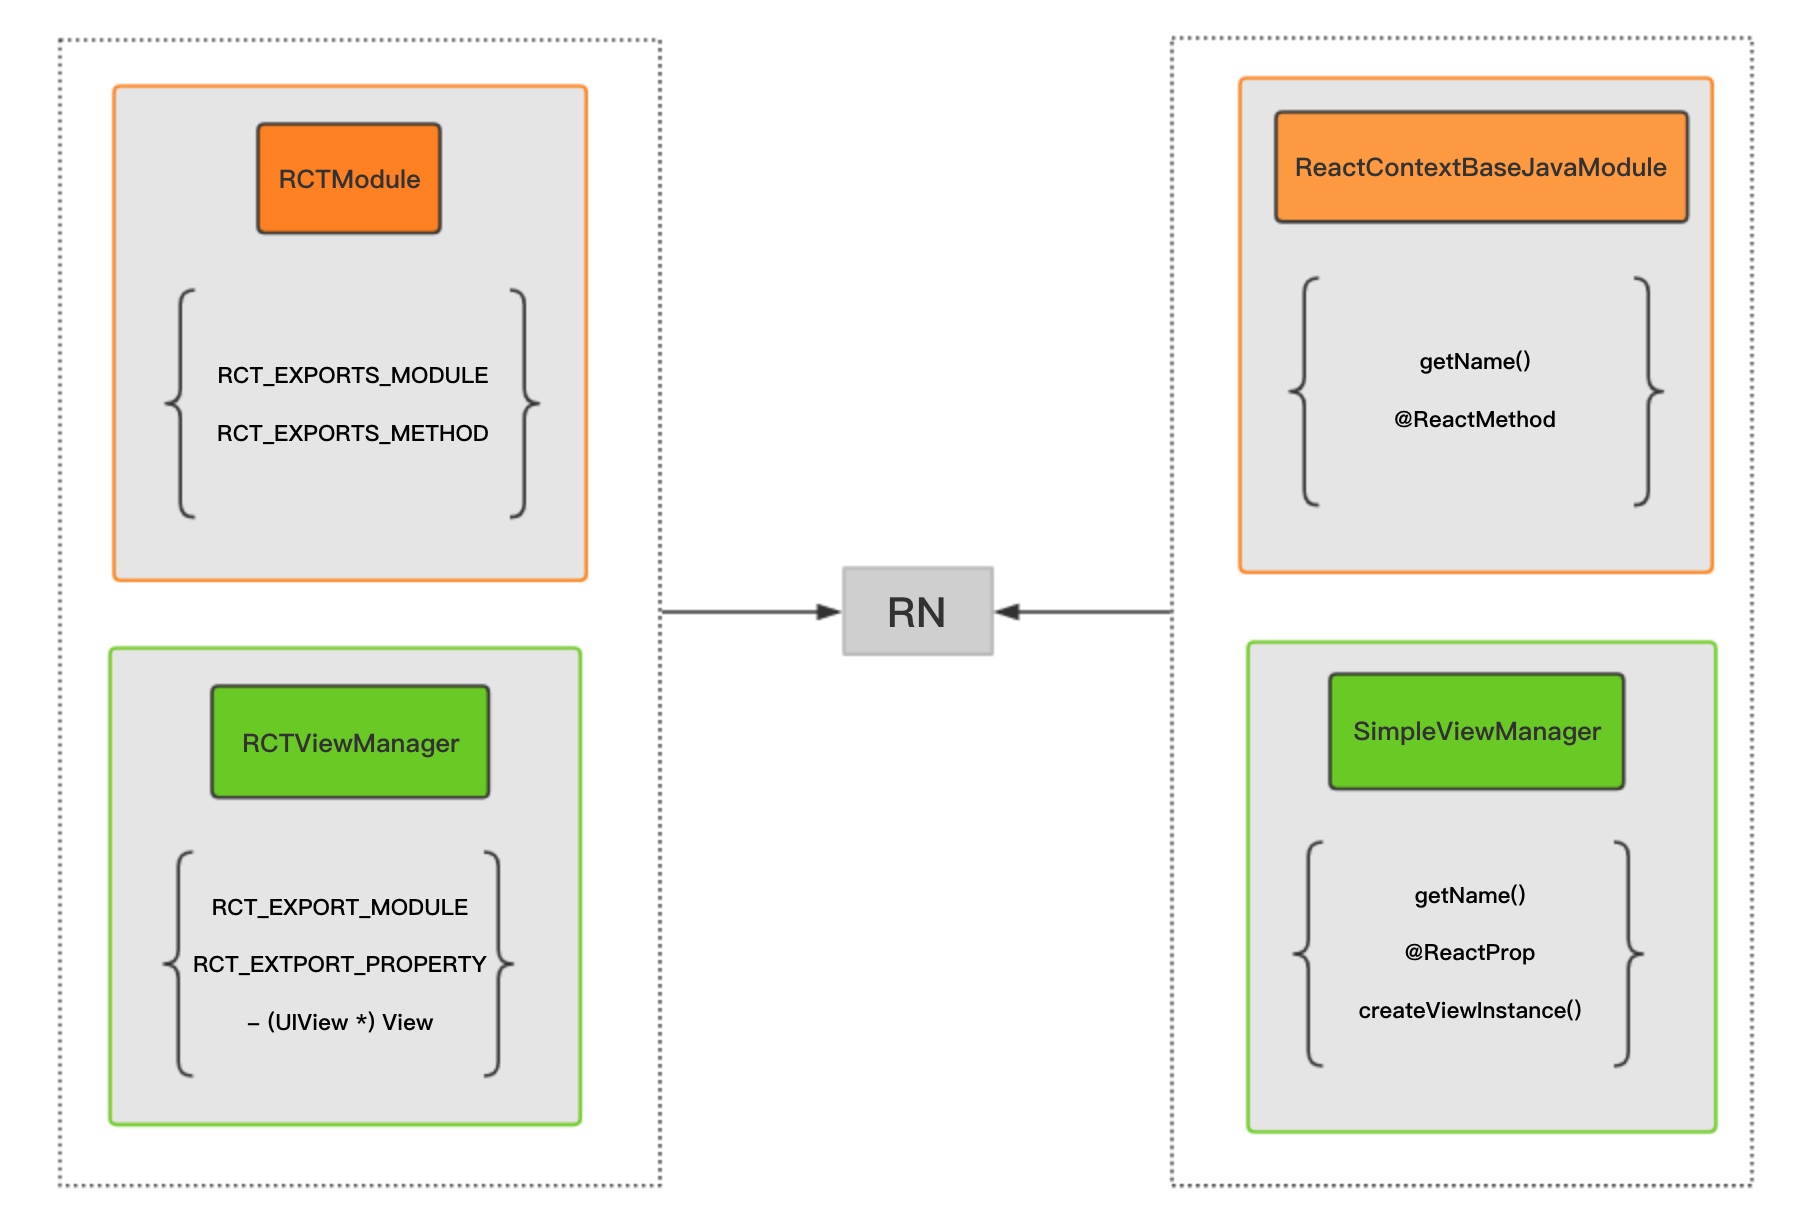
NativeBridge
打包
iOS
1.执行打包命令
1
| react-native bundle --entry-file index.js --platform ios --dev false --bundle-output release_ios/main.jsbundle --assets-dest release_ios/
|

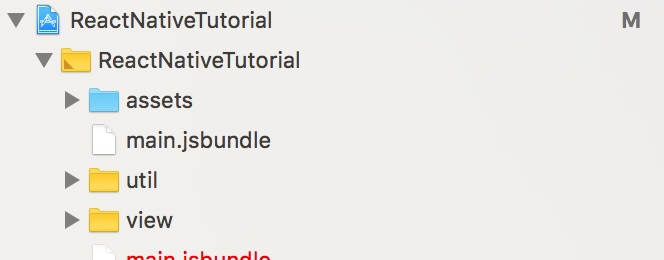
2.将 assets 与 main.jsbundle 添加到项目中
3.修改 AppDelegate.m,让 React Native 去使用我们刚才导入的 jsbundle
1
2
3
4
5
6
7
8
9
10
| - (BOOL)application:(UIApplication *)application didFinishLaunchingWithOptions:(NSDictionary *)launchOptions
{
NSURL *jsCodeLocation;
//jsCodeLocation = [[RCTBundleURLProvider sharedSettings] jsBundleURLForBundleRoot:@"index.ios" fallbackResource:nil];
+jsCodeLocation = [[NSBundle mainBundle] URLForResource:@"main" withExtension:@"jsbundle"];
#endif
...
return YES;
}
|
4.在 iTunes Connect 创建应用 ➜ 打包程序 ➜ 将应用提交到app store
Android
参考
- 生成证书
- 配置gradle
1
2
3
4
5
6
7
8
9
10
11
12
13
14
15
| android {
signingConfigs {
release {
storeFile file_dir
storePassword store_assword
keyAlias alias
keyPassword keyp_assword
}
}
buildTypes {
release {
signingConfig signingConfigs.release
}
}
}
|
3.打包 APK
1
| ./gradlew assembleRelease
|
热更新
codepush
https://microsoft.github.io/code-push/
自己实现
参考1
参考2
以 Android 为例
1
| react-native bundle --entry-file index.js --platform android --dev false --bundle-output release_android/main.jsbundle --assets-dest release_android/
|
- 1.初始项目发布时,生成并保留一份 bundle 文件。
- 2.有版本更新时,生成新的 bundle 文件,
- 3.使用 google-diff-match-patch 对比两个文件,并生成差异补丁文件。
- 4.App 下载补丁文件,再使用 google-diff-match-patch 和 assets 目录下的初始版本合并,生成新的 bundle 文件。
